Connect Tech Support

  • Subscribe to our RSS feed.
  • Twitter
  • StumbleUpon
  • Reddit
  • Facebook
  • Digg

Monday, 4 June 2012

Introduction to ApplicationHost.config

Posted on 09:58 by Unknown


Introduction 

ApplicationHost.config is the root file of the configuration system when you are using IIS 7 and above. It includes definitions of all sites, applications, virtual directories and application pools, as well as global defaults for the web server settings (similar to machine.config and the root web.config for .NET Framework settings).
It is also special in that it is the only IIS configuration file available when the web server is installed (however, users can still add web.config files if they want to). It includes a special section (called configSections) for registering all IIS and Windows Activation System (WAS) sections (machine.config has the same concept for .NET Framework sections). It has definitions for locking-down most IIS sections to the global level, so that by default they cannot be overridden by lower-level web.config files in the hierarchy.
The location of the file is currently in the system32\inetsrv directory, but this is expected to change after beta2 to system32\inetsrv\config. This document walks through all the sections, in the order they appear in the file, and explains them one by one. The most complex section is system.webServer, so it is recommended for the reader to not skip reading the description for that section in particular.
Note the following:
  1. This document specifies the content of each configuration section, as appears in applicationHost.config. By design, many of the sections are empty or not complete (only some of their content appears in the XML). The rest of the values are taken from the schema defaults. This is done to avoid too much information and cluttering of the file, and in order to keep it reasonably readable.
For full schema reference, including default values for all properties in every section, their valid ranges, etc., refer to %windir%\system32\inetsrv\config\schema\IIS_Schema.xml (for IIS settings), or ASPNET_Schema.xml (for ASP.NET settings), or FX_Schema.xml (for other .NET Framework settings).
For convenience, chunks of these files are included in this document in the appropriate sections so the reader can understand which properties are available, what the default values are, etc., for each section. See the additional note below about how to read schema information.
    2.   Make a backup of the file before making any changes to it.

How to Read Config Schema

As noted above, this document contains snippets of schema information for each section, so the reader can discover what properties are available and what their default values and valid ranges are. The snippets are taken directly from the configuration schema file for IIS settings: %windir%\system32\inetsrv\config\schema\IIS_Schema.xml. This section explains how to read schema information.
The schema for each configuration section is defined in a XML element. There is no schema definition for section groups. The following format is used here to explain how to read the schema:
<attribute-name>="<default-value>"  [<metadata>] [<description>]
<attribute-name> is the name of the configuration attribute, as appears in XML. Every attribute must have a name.
<default-value> is the value used by default, if no other value is specified in the XML for the attribute. Not all attributes have default values (for example, site name). In this case, the syntax will be "".
<metadata> contains several items:
  • The runtime type of the attribute. This is one of "bool", "enum", "flags", "int", "int64", "String", "timeSpan". Every attribute must have a type.
  • "bool" is "true" or "false".
  • "enum" is a set of possible values, where only one of them can be set for the attribute. Every such value has a numerical value and a friendly name. The syntax is using the character "|" as a delimiter between the friendly names: value1|value2|…|valueN.
  • "flags" is similar to "enum", except that combinations of values are allowed. Therefore the numerical values should be in multiples of 2, so they can be ORed together to form combinations. The syntax is identical to "enum": value1|value2|…|valueN.
  • "int" is a 32 bit integer.
  • "int64" is a 64 bit integer.
  • "String" is a character string.
  • "timeSpan" is a representation of a time unit, similar to the managed-code type TimeSpan. It can be persisted as a number (representing seconds, or minutes); or as a formatted string in the form of "[dd:]hh:mm:ss". The "[dd:]" element represents an optional number of days. The other elements represent numbers of hours, minutes and seconds, respectively. The "timeSpanFormat" attribute specifies which format should be used: number of seconds, number of minutes, or a formatted string.
  • Required attributes are marked "Required". It means that a value for them must be set in the XML. For example, site name is a required attribute (every site must have a name in IIS 7.0 and above).
<description> is a short description of the attribute.

Section Schema

The <sectionSchema> XML element is the base unit of schema information. All other schema information is specified within it. It has one attribute directly in it ("name"), and then the rest of the schema is in sub-elements within it:

<sectionSchema name=""  <!-- [String, Required] [XML full path of the section] --> >
    <!-- sub-elements here describing rest of schema; -->
    <!-- their description is right below in the doc. -->

</sectionSchema>

Attribute Schema

Every attribute is defined in a corresponding <attribute> XML element in the schema. The <attribute> element may be in the <sectionSchema> element directly (if the attribute is in the section scope); or in the element (if the attribute is in a sub-element within the section); or in the <collection> element (if the attribute is in a collection within the section).
An attribute schema must specify a name and a runtime type for the attribute. It may mark the attribute as required. It may mark the attribute as the unique key (if inside a collection), or as part of a collection key (together with other attributes). It may specify a default value for the attribute. It may mark the attribute for automatic encryption on-disk. It may specify if the word "Infinite" is allowed as a value for the attribute (only for numeric types such as int and in64, and for timeSpan). It may specify the timespan format (seconds, minutes or formatted string) for timespan attributes. It may specify validation rules for the attributes (see Attribute Validation section below in this document).
<attribute
    name=""  [String, Required] [XML name of the attribute]
    type=""  [bool|enum|flags|int|int64|string|timeSpan, Required][Runtime type]
    required="false"  [bool] [Indicates if must be set]
    isUniqueKey="false"    [bool] [Serves as the collection key]
    isCombinedKey="false"  [bool] [Part of a multi-attribute key]
    defaultValue=""  [String] [Default value or comma-delimited flags]
    encrypted="false"  [bool] [Indicates if value persisted encrypted]
    allowInfinite="false"  [bool] [Indicates if "Infinite" can be set]
    timeSpanFormat="string" [string|seconds|minutes] [hh:mm:ss or number]
    validationType=""       [See validation below]
    validationParameter=""  [See validation below]
/>

Element Schema

Every element is defined in a corresponding <element> XML element in the schema. Elements can be nested. An element is simply a container for other attributes, or sub-elements. It must have a name and it may serve as a container of default values for collection elements (for example, siteDefaults holds the default values for sites in the <sites> collection).

Collection Schema

Every collection is defined in a corresponding <collection> XML element in the schema. Collections contain multiple elements, which can be added and removed from them individually. Typically the collection directive names are "add", "remove" and "clear", but some collections use different names for clarity (for example, the collection is using "site" instead of "add").
This is done by specifying values for addElement, removeElement and clearElement in the collection schema. If a collection directive is missing from the schema, the collection will not support it. The collection schema may specify the name of a default element that will be used as a container of default values for collection elements (this complements isCollectionDefault in the element schema).
For example, the collection is using siteDefaults as the default element. Most collections append elements as they merge configuration files down the namespace, but some may specify mergeAppend="false" in the schema to have a prepend behavior. For example, consider two levels of configuration: applicationHost.config and web.config in a site. In applicationHost.config:
<myCollection>
    <add value="1"/>
</myCollection>
In web.config:
<myCollection>

    <add value="2" />        
</myCollection>            
If the collection appends, its merged (effective) configuration at the site level will be:
<myCollection>

    <add value="1"/>

    <add value="2"/>    
</myCollection>
However, if it prepends, it will be:
<myCollection>

    <add value="2"/>

    <add value="1"/>    
</myCollection>
Some collections may allow duplicate entries by specifying allowDuplicates="true" in their schema. This is mostly done to support legacy collections in the .NET framework (in machine.config).
Some collections may allow additional attributes in them, beyond those specified in the schema. This is done by specifying allowUnrecognizedAttributes="true" in their schema. It is mostly done to support provider-based collections in the .NET framework.
<collection          
    addElement=""     [String] [Name of Add directive, if supported]
    removeElement=""  [String] [Name of Remove directive, if supported]
    clearElement=""   [String] [Name of Clear directive, if supported]
    defaultElement="" [applicationDefaults|applicationPoolDefaults|siteDefaults|virtualDirectoryDefaults] [See isCollectionDefault]
    mergeAppend="true"  [bool] [Indicates whether or not deepest set values are appended]
    allowDuplicates="false"  [bool] [Indicates if multiple elements may have the same keys]
    allowUnrecognizedAttributes="false"  [bool] [Indicates if non-schema attributes ok]
/>

Enum Schema

Every attribute of type "enum" must define its enum values in a corresponding <enum> XML element in the schema. Every value must have a friendly name and a numerical value.
<enum name=""  [String, Required] [Friendly name of the enum]
    value="" [int, Required] [Numeric value]
/>

Flags Schema

Every attribute of type "flags" must define its flag values in a corresponding XML element in the schema. Every flag must have a friendly name and a numerical value that can be ORed together with other values to form combinations; therefore, the value should be in multiples of 2.
<flags          
    name=""  [String, Required] [Friendly name of the flag]
    value="" [int in power of 2, Required] [Numeric value]
/>

Attribute Validation

Attribute validation is done when parsing the XML to get a section from the file, and when calling the configuration API to set values. If validation fails, it fails the desired operation (getting the section or setting the invalid value).
Each attribute may associate one validator for its value. This is done by specifying the appropriate validator name in the validationType, and additional parameters in the validationParameter in the attribute schema.
The system supports these validators:

ApplicationPoolName validator

This validator fails on these characters: |<>&\"

validationType="applicationPoolName" validationParameter=""

IntegerRange validator

This validator fails if value is outside [inside] range, in integers.

validationType="integerRange"
validationParameter="<minimum>,<maximum>[,exclude]" 

NonEmptyString validator

This validator fails if string value is set.

validationType="nonEmptyString"
validationParameter="" 

SiteName validator

This validator fails on these characters: /\.?

validationType="siteName"
validationParameter=""

TimeSpanRange validator

This validator fails if value is outside [inside] range, in seconds.

validationType="timeSpanRange"
validationParameter="<minimum>,<maximum>,<granularity>[,exclude]" 

TrimWhiteSpace validator

This validator fails if white space is set at start or end of value.

validationType="trimWhiteSpaceString"
validationParameter=""

XML Header

Every configuration file is an XML file and may optionally include the following line as the first line:

<?xml version="1.0" encoding="UTF-8" ?>  
In addition, it must include all its content within an XML <configuration> tags:

<configuration>

   <!-- [All of the context goes here] -->


</configuration>            
ApplicationHost.config includes the above lines in it. The rest of this document walks through the rest of the sections in the file.

<configSections> Section

This is the very first section in the file. It contains a list of all other sections in the file. This is the point of registration for the sections (for example, to unregister a section from the system, remove its line from this section – no need to remove its schema file from the config\schema directory).
Note that other configuration files may have a section as well, at the very top of the file. This may be useful to register sections at levels lower than the global level. These sections will be registered for that scope of the namespace only. Web.config files can only add sections to the system; they cannot redefine sections that were registered in parent levels, and they cannot remove (unregister) sections.
The sections are structured by their hierarchy of containing section groups. Each section registration specifies the section name; the managed-code type of the section handler (this has no meaning in this file and will get removed after beta2 – it is used only by System.Configuration, so it will still exist in machine.config and web.config files); the allowDefinition level, if differs from the default; and the overrideModeDefault (this attribute is used to lockdown most IIS sections in this file).
Note: Section is the basic unit of deployment, registration, locking, searching and containment of configuration settings. Every section belongs to one section group ("immediate parent"). Section group is a container of logically-related sections, and is used solely for purposes of structured hierarchy. No operations can be done on section groups. Section groups cannot have configuration settings directly (the settings belong to sections). Section groups may be nested; section cannot.

Schema


<section
    name=""  [Required, Collection Key] [XML name of the section]
    allowDefinition="Everywhere" [MachineOnly|MachineToApplication|Everywhere] [Level where it can be set]
    overrideModeDefault="Allow"  [Allow|Deny] [Default delegation mode]
/>

Locking

Most IIS sections are locked down by default, using overrideModeDefault="Deny" in the section. The recommended way to unlock sections is by using tags, as follows:
<location path="Default Web Site" overrideMode="Allow" >

  <system.webServer>

    <asp/>

  </system.webServer>            
</location>    
The above location tag unlocks the section for the default web site only. To unlock it for all sites, specify this in applicationHost.config:
<location path="." overrideMode="Allow">

    <system.webServer>

         <asp/>

    </system.webServer>

</location>            
Note: path="." and path="" have the same effect. They refer to the current level in the hierarchy.
Read More
Posted in | No comments

Sunday, 3 June 2012

How to Capture ASP.NET Page Trace Events in IIS 7.0 Tracing

Posted on 00:02 by Unknown

Introduction

In ASP.Net today, developers can add trace events to ASPX pages using Trace.Write() & Trace.Warn() calls in the script sections of their page.  Typically, you use these traces to debug an application that does not work as expected. 
These events appear when you enable tracing for the page (set <%@ Page Trace="True"  %>).  You can only view these events by default when browsing the application from the server (i.e. Localhost), or when you enable Application Tracing to keep the last given number of sessions. 
However, the problems with this process are:
  • These traces are not persisted, so if the process goes away, so do your traces
  • These traces are collected regardless of the status code for the request – i.e. if it succeeds or fails, you get traces
  • These traces are viewed completely separately from any other infrastructure traces provided by IIS 7.0 or ASP.net
In IIS 7.0, you can now collect these traces in Failed Request Tracing or ETW tracing in addition to viewing them normally.  And, you can view these traces in conjunction with IIS and ASP.net infrastructure traces. 
Tasks illustrated in this walkthrough include:
  • Configuring failed-request tracing to capture ASP.net Page Trace.Write and Warn calls 
  • Generating the failure condition and viewing the resulting trace capture, finding the Trace.Write and Trace.Warn calls.

Prerequisites

The following steps include the prerequisites necessary for completing the tasks in this article.

Step 1 : Installing IIS 7.0

IIS 7.0 must first be installed.  To check if IIS 7.0 is installed, browse to http://localhost. If you see the "under construction" page, then IIS 7.0 is installed.  If IIS 7.0 is not installed, refer to the "Installing IIS 7.0" guide for installation instructions. 
Make sure to install the following IIS 7.0 Components:
  • ASP (under World Wide Web Services => Application Development Features => ASP)
  • Tracing (under World Wide Web Services => Health & Diagnostics => Tracing)

Step 2 : Log In as Administrator

Make sure to login to the administrator account or in the Administrators group. 
Note: Being in the Administrators group does not grant you complete administrator privileges by default.  You must run many applications as Administrator. Right-click the application icon and choose "Run as Administrator". 

Step 3 : Make a Backup

You must make a backup of the configuration before executing tasks in this article.  Run the following:
    1. Click the Start button -> All Programs -> Accessories -> (r-click)Command Prompt -> Run as Administrator.

    2. Execute the following command in that command prompt:
%windir%\system32\inetsrv\appcmd add backup

Adding a New Trace.Write() & Trace.Warn() Call to a Sample ASPX Page

In this task, you add Trace.Write() & Warn() calls to a sample aspx page and view the resulting traces in your browser.
  1. Use the Administrator command prompt and navigate to your %systemdrive%\inetpub\wwwroot directory.
  2. Use your editor of choice and create an aspx page called trace.aspx, putting the following code in the page:
<%@ Page language="C#" trace="true" %>

<%
  Trace.Write("Hey, there");
  Trace.Warn("Doh, a warning");

  Response.Write("hello, world");
%>
3. Browse to http://localhost/trace.aspx. You see the following:


Notice the events above: "Hey, there" and "Doh, a warning". 
We have just added a new event to our page.  Now see if we can get Failed Request Tracing to capture it.

Adding a New Trace.Write() & Trace.Warn() call to a Sample ASPX Page

The page is now instrumented with Trace.Write & Trace.Warn calls.  Configure Failed Request Tracing to capture the ASPX page Trace.Write() & Warn() calls. 
For this scenario, we must use the ASP.Net provider's Page area, with Trace.Write calls corresponding to the Verbose verbosity level, and Trace.Warn() calls corresponding to the Warning verbosity level.  Setting the verbosity level to Verbose gets both.

Step 1 : Enabling Failed Request Tracing for Your Site

Failure Request Tracing first must be enabled for the site.  Steps to enable are found in the HOWTO-FailureRequestTracing Walk Through, Task 1. 

Step 2 : Creating a Failed Request Tracing Rule to Capture the Trace.Write() & Warn() Events

    1. From the Administrator command prompt, type start inetmgr. In the Connections panel, expand the machine name, then Sites folder, then click  theDefault Web Site. Under IIS, double-click Failed Request Tracing Rules.

   2. In the Actions pane, click Add…. to launch the Add Failed Request Tracing Rule wizard. On the Specify Content to Trace page, click theASP.NET (*.aspx) option for what to trace and click Next. 


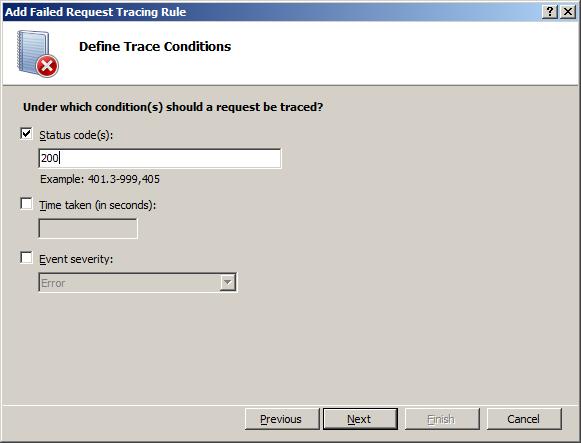
    3. In the Define Trace Conditions screen, check the Status Codes check box and enter "200" as the status code to trace.


  4. Click Next. The Select Trace Providers page appears. Select the ASPNET check box and the Page check box under "Areas" (uncheck all other areas that are checked except Page) Under Verbosity, select Verbose.


 5. Click Finish.  You see the following definition for the Default Web Site:


Step 3 : Test and View

In this step, we generate a request for http://localhost/trace.aspx and then check the Failed Request Tracing log file to see the trace events. 
To verify that it worked:
  1. Open an Administrator-elevated new Internet Explorer window.
  2. Type in the address http://localhost/trace.aspx. 
  3. We generated the traced request, so open an Administrator-elevated Internet Explorer window, enter CTRL-O to open a file, and navigate to inetpub\logs\FailedReqLogFiles\W3SVC1 folder.  In the HTML Files dropdown list, select All Files.
  4. Select the most recent FR######.xml file.  You see the following:


The events display above in the trace log.  Notice that the event "Doh, a warning"'s SubType Name is "AspNetPageTraceWarnEvent" - that is the Trace.Warn() event. 
All Trace.Write() calls are very high verbosity (verbosity = "Verbose");  hence, the reason for the <Level>5</Level>, while all Trace.Warn() calls are logged as Warnings. 
Note: There are many other "AspNetPageTraceWriteEvent" events logged.  This is because all the other entries in the trace table, like Begin PreInit, etc., are all logged through the same infrastructure as well. 

Summary

We finished adding trace messages to the ASPX page. We configured IIS 7.0 to capture those traces, when enabled, in the Failed Request Trace Logfile. Remember that these trace entries are only logged to the trace logs if the page's trace="true" directive is set, and the ASP.NET provider with the "Page" area is defined when tracing (either using ETW or Failed Request Tracing).

Read More
Posted in | No comments

Saturday, 2 June 2012

Installing and Configuring Web Deploy

Posted on 01:04 by Unknown

Installing and Configuring Web Deploy for Administrator and non-administrator Deployments

Summary

In this walkthrough, we will show steps for installing and configuring Web Deploy for administrator or non-administrator deployments. This means the steps necessary to enable a client to use Web Deploy to publish Web site content to the server, even if the client does not have administrator credentials for the server.

Install and Configure Web Deploy for Non-Administrator Deployments

Requirements:

The server must have an operating system that comes with IIS7— this means either Windows Server 2008 or Windows Server 2008 R2.

Use WebPI to install Web Deploy along with its dependencies like the Web Management Service (WMSvc)

  1. Set up your machine like a hosting server using the "Recommended Configuration for Hosting Providers" product
    1. Download the Web Platform Installer
    2. Click in the search bar in the upper-right hand corner and search for "Recommended"


c.  Add the "Recommended Server Configuration for Web Hosting Providers" product and click Install
  •  Note that this bundle includes some optional components, such as PHP and MySQL,  which you can choose not to install with this bundle by clicking the "X" next to them on the next screen.
  1. Install Web Deploy by using either method 1 or 2 below:
    1. Install Web Deploy and dependent products using the Web Platform Installer
      1. Download the Web Platform Installer. http://www.microsoft.com/web/downloads/platform.aspx
      2. In the upper-right hand corner, click in the search box, type "Web Deploy", and press ENTER


Add the "Web Deployment Tool 2.1 for Hosting Servers" product and click Install.


Download the Web Deploy installer directly from the IIS.net Web Deploy page  http://www.iis.net/download/webdeploy ( x86 | x64 )

In the Setup wizard choose the “Complete” setup option.


      1.  Note: Using the MSI directly is generally not recommended for the novice user, as recommended or required dependent products must then be installed separately. The following limitations may create issues when using the MSI instead of WebPI to install Web Deploy on servers:
        1. The MSI will not install SQL Shared Management Objects (SMO), which is required for the SQL Server database deployments. This component may be installed using WebPI to enable SQL Server database deployments.
        2. The MSI will not install the Web Management Service handler component if the Web Management Service is not installed; the handler component is necessary for non-administrator deployments. Windows component IIS, including Management Service, should be installed first to enable the handler component to install.
        3. The MSI will not configure Web Management Service to allow non-administrator deployments if PowerShell v2 is not installed. This setup step includes creating delegation rules in the IIS server Administration.config file that allow non-administrator users to use Web Deploy. PowerShell v2 is built-in on Windows Server 2008 R2 but may require a Windows Update for Windows Server 2008. Alternatively the delegation rules may be added manually after install.

Configure a Site for Delegated Non-Administrator Deployment

After installing Web Deploy using method (1) or (2a), described above, all server-level configuration is complete for non-administrator publishing, however additional configuration is required at a site level. This site configuration can be accomplished using methods (1) or (2) described below.
  1. Create a new site or set permissions on an existing Web site for a new or existing non-administrator user using Web Deploy PowerShell scripts as explained in the PowerShell scripts walkthrough [link to be added] OR
  2. Configure publishing on an existing site for an existing user using the IIS Manager UI
    1. Start IIS Manager (type “inetmgr.exe” in the Start Menu)
    2. Expand the Sites node and right click a site, such as "Default Web Site"
    3. Click Deploy > Configure for Web Deploy Publishing...
    4. The following UI will appear. Click ... 


Click Select : 


Type the name of a non-administrator Windows user and click Ok 


  1. When you click Setup, the following log will lines will appear:
  • Publish enabled for 'NonAdminUser'
  • Granted 'NonAdminUser' full control on 'C:\inetpub\wwwroot'
  • Successfully created settings file 'C:\Users\JohnDoe\Desktop\NonAdminUser_Default Web Site.PublishSettings'
  1. The non-administrator Windows user (NonAdminUser) may now publish to the site (Default Web Site).

Install and Configure Web Deploy for Administrator deployments

Requirements:

Install Web Deploy using method (1) or (2a) described above. If you are using a client operating system such as Vista or Windows 7, or a Windows server version without IIS7+, such as Windows Server 2003, you will need to choose the Web Deployment Tool 2.1 product option in the Web Platform Installer (in install method 2a), or install directly from the Web Deployment Tool download page (install method 2b). For these client or server 2003 machines the Web Management Service handler component and associated delegation rules will not be applicable.

Trouble-shooting Common Issues:

  • If you are upgrading an existing installation of Web Deploy, make sure to restart the handler and agent services by running the following commands at an administrative command prompt:
  • net stop msdepsvc & net start msdepsvc
  • net stop wmsvc & net start wmsvc
  • Make sure your firewall allows connections to the service you are using. By default, the Web Deployment Agent Service (MsDepSvc) listens on port 80, and the Web Management Service (WmSvc, also called the "handler") listens on port 8172 by default.
  • You must run MsDepSvc by using the built-in Administrator account, or from a domain account that has been added to the Administrators group. A local administrator which is not the built-in account will not work with MsDepSvc.
  • Check to see if .NET 4.0 has not been registered with IIS:
    Symptoms: .NET 4.0 is installed, but there are no .NET 4.0 application pools or handler mappings in IIS.  You cannot browse to applications that use .NET 4.0 (for example, applications based on WebMatrix’s site template applications) after you publish them.
    Cause: Your machine had .NET 4.0 installed on it before IIS was installed.
    Solution: Run the following command to register .NET 4.0 with IIS:  %systemdrive%\Windows\Microsoft.NET\Framework64\v4.0.30319\aspnet_regiis.exe -iru

Read More
Posted in | No comments
Newer Posts Older Posts Home
Subscribe to: Posts (Atom)

Popular Posts

  • How to schedule a PHP script in task scheduler
    Quiet often there is a need to execute/run  php  script on some time interval at server side. And that php scripts should run automatically ...
  • HTTP Error 403.19 – Forbidden The configured user for this application pool does not have sufficient privileges to run CGI applications.
    If you get the error “HTTP Error 403.19 – Forbidden The configured user for this application pool does not have sufficient privileges to...
  • Roles and Features showing an error HRESULT: 0x800F0818 in Server Manager of windows server 2008 R2
    When you open Server Manager both Roles and Features display Error and you are unable to add any role or features. When you select the det...
  • 503 This mail server requires authentication when attempting to send to a non-local e-mail address
    If you are facing the following error in receiving the emails for Plesk Webmail on Windows server: We recommend contacting the other email ...
  • Disallowed Parent Path
    If you are unable to access the website and facing the below error: Active Server Pages error 'ASP 0131' Disallowed Parent Path /adm...
  • Unable to shrink database log file ( DBCC shrinkfile gives error)
    Sometimes when trying to shrink the database log file for Ms SQl Database using DBCC SHRINKFILE ('database-name_Log', 1), which is...
  • How to Install Smartermail 9
    This article walks you through the installation of SmarterMail 9 on your Windows server. Please note that Smartermail 9 requires ASP.net 4...
  • Could not load file or assembly \'CrystalDecisions.ReportAppServer.ClientDoc, Version=13.0.2000.0
    If you face the below crystal report related error, kindly search the required crystal report from following link and install it. http://sc...
  • How to Change RDP Port
    The setting for the Terminal Services port lives in the following registry key: HKEY_LOCAL_MACHINE\SYSTEM\CurrentControlSet\Control\Termina...
  • How to configure IIS 7 to redirect non-www domain to www domain?
    One of few legacy leftovers that was never dropped over the years is the common use of www domain prefix. It is not a problem per se for us...

Categories

  • booting Process
  • linux
  • redhat

Blog Archive

  • ▼  2013 (68)
    • ▼  July (1)
      • How to schedule a PHP script in task scheduler
    • ►  May (2)
    • ►  April (11)
    • ►  March (54)
  • ►  2012 (44)
    • ►  September (20)
    • ►  August (1)
    • ►  July (4)
    • ►  June (12)
    • ►  May (2)
    • ►  March (4)
    • ►  February (1)
  • ►  2011 (1)
    • ►  February (1)
  • ►  2009 (9)
    • ►  September (3)
    • ►  August (2)
    • ►  June (1)
    • ►  May (2)
    • ►  March (1)
Powered by Blogger.

About Me

Unknown
View my complete profile